
 Explore Worlds
 Find Life
 Defend Earth


Why are there no stars in most space images?
And how come dimly lit worlds like Pluto look so bright in space photos?
Written by
Emily Lakdawalla
January 28, 2019
There are a few questions that we get all the time at The Planetary Society. Look up at space at night from a dark location and you can see innumerable stars. Why, then, do photos of things in space not contain stars? How come the black skies of the Moon contain no stars in Chang’e photos?
The answer: The stars are there, they're just too faint to show up.
I can illustrate with an example from everyday life. I'm sure that everyone reading this article has made the mistake of shooting a photo of a loved one standing in front of a brightly lit window. In your photo, all you can see is a silhouette; your subject's face is a nearly featureless shadow. Their face still exists, of course! It's just not brightly lit enough to show up in the photo.
The same issues that can make your casual snapshots look bad affect space images, too. Let's talk about three things that affect what details you can see in any photo, whether it's of a star, a planet, or a person: the sensitivity of the camera, the time your camera had to collect light, and the dynamic range of your camera.
Where did the stars go? Look up at space at night from a dark location and you can see innumerable stars. So why do photos of planets and moons in space not show the stars in the background? It all comes down to the same kinds of camera settings you'd use on a regular camera.
How Sensitive Is Your Camera?
How much light does your camera need to see by? Fancy cameras can adjust sensitivity by opening and closing the aperture that lets in the light. Human eyes do the same thing, automatically, all the time, by dilating and contracting their pupils. If you're a sighted person walking from a brightly lit to a dark outdoor area, you won't see stars in the sky either, at least not right away. As your eyes dial up their sensitivity by opening up your pupils, you slowly notice fainter and fainter stars.
Most space cameras actually can't adjust their aperture in this way. Instead, scientists predict the light levels that a camera will encounter through its mission, and design their instruments to have an aperture that's an appropriate size for the range of targets they expect to encounter. This can be a challenge if your spacecraft will encounter a wide range of target brightnesses, but you make your camera to work on the intended science targets and don't worry if it isn't ideal for any fun extras you may photograph along the way. OSIRIS-REx, whose MapCam was designed to study the colors of a very dark-toned asteroid, couldn’t look at Earth without getting overwhelmed by the brilliant light reflecting off of bright clouds, causing the artifacts you see in the top of this image.

But MapCam images of Bennu look fine, because that’s what MapCam was designed to photograph. (Note that in neither of these images can you see stars in the black space surrounding the worlds.)

How Long Does Your Camera Have to Collect Light?
Longer exposures collect more light -- helping to detect fainter things -- than shorter exposures. There's no real equivalent for exposure setting in human vision -- we notice more when we stare at something longer, but that's not quite the same thing. Photographs of the night sky that are full of stars are long exposures, often taking many minutes -- it takes that long for the camera to detect enough photons for a pretty view. Short exposures don't catch stars. The photo below was a minutes-long exposure. What looks like sunlight on the mountains is actually moonlight.

The Apollo astronauts' photos were exposed for the brightly sunlit lunar surface and white space suits. These exposures were too short to detect stars in the sky.

Space cameras can permit a very wide range of exposure settings. New Horizons’ LORRI camera, for instance, can shoot images with exposures as short as 1 millisecond and as long as 30 seconds. They used the shortest exposure setting when they were flying past Jupiter, which is much closer to the Sun and much brighter than Pluto. They use the longest exposures for the faintest targets -- distant worlds in the Kuiper belt.
As an aside, this answers another common question we get about space images: how can cameras see to take pictures so far from the Sun, where the light is so comparatively dim? The answer: we send sensitive cameras and, if necessary, take long exposures. Voyager 2 at Neptune provides good examples of what happens when we send a camera that's not sensitive enough. Designed for Jupiter and Saturn, it had a tough time seeing in the relative dark at Neptune.

What Is the Dynamic Range of Your Camera?
Is your camera capable of seeing both dimly-lit and well-lit things in the same image? Or does its light-collecting capacity get quickly overwhelmed by brighter things before it's had time to detect any light from dimmer things? Here is where our eyes generally do much better than our cameras. When I see a friend sitting in front of a window, I can see their face just fine because my eyes are capable of discerning detail in both shadow and sunlight. This is partly because my eyes aren’t still when I look at a scene. My eyes constantly dart about, looking out the window, looking indoors, looking at my friend’s face, each time adjusting focus and aperture. My brain builds up a composite of all this information, making the view in my mind’s eye more detailed than any instantaneous view from my physical eye. Then I take out my camera and take a picture, and it looks terrible.
But wait -- modern digital cameras have a trick that mimics what the human eye and brain do. With my phone camera I can turn on a feature called “HDR,” which stands for high dynamic range. When I take a photo in HDR mode, the phone actually takes two photos (one longer-exposure, one shorter) and merges the best-exposed parts of both images, to show me details both outside the window and in my friend’s features.
Space cameras typically have higher dynamic range than consumer cameras, so are able to record relatively faint and bright things in the same image. It can be hard to appreciate just how much detail there is in the shadows of space images, because our everyday digital displays are mostly not capable of such high dynamic range. But you can play with brightness and contrast in space images to reveal hidden details in the shadows. Check out what’s visible in two different contrast stretches of a Rosetta OSIRIS image of comet Churyumov-Gerasimenko. It's the same photo, made from the same data, I've just told the computer to display low pixel values with higher brightnesses.


Example: New Horizons
Let's explore how exposure settings and other factors make stars visible sometimes and not at other times. Let's travel together aboard New Horizons as it uses its LORRI camera to take pictures of targets with varying intrinsic brightnesses, catching some stars along the way. As I mentioned earlier, LORRI has a fixed aperture and high dynamic range and can use a wide range of exposure settings. One of the coolest targets at Jupiter is the volcanic moon Io. Here’s a LORRI picture of Io taken as New Horizons approached the Jupiter system. The photo used a 4-millisecond exposure. Io is well-exposed, and no stars are visible.

A few seconds later, LORRI took another photo of Io, with a much longer exposure: 75 milliseconds. Io is severely overexposed, and the effects of that overexposure are causing something called “readout smear,” the streaky effect across the image. Why would they do that? Check out the edge of Io’s disk. You can see at least three volcanic plumes erupting off Io’s surface. At this exposure setting, there are rich details visible in the plumes. Still, even with an exposure almost 20 times longer than the above Io image, I’m not convinced that any stars are visible. (I'm not sure what the one dot to the right of Io is, but it's the only one in the photo, and is very bright; I think it's probably a cosmic ray hit.)

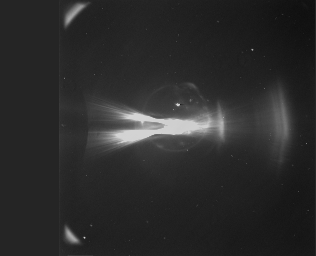
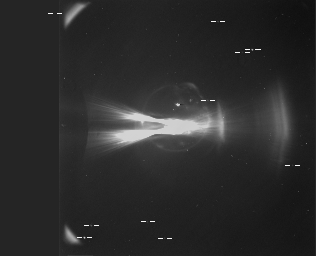
Here’s a different set of Io images. By this time, 2 days later, Io had moved around Jupiter and into Jupiter’s shadow. No sunlight is hitting Io’s surface. You’re seeing Io glowing away in the dark, lit by its hot volcanic plumes. (You’re also seeing a lot of camera artifacts caused by stray light -- Io was in eclipse, but New Horizons was not; Jupiter’s light is bouncing into the camera, causing splashes of light and a bright background. There is also a ton of fuzz caused by energetic particles hitting the detector -- Jupiter has a lot of that stuff flying around.) Think for a minute about how cool it is that we can see the hot glow of Io's volcanoes in the utter dark of an eclipse! It took a much longer exposure, nearly 8 seconds, to make Io’s self-light from its volcanoes visible to LORRI. Finally we have a long enough exposure to see stars in the background. In fact, I’ve used those stars to align the images; in this animation, stars hold still while Io moves around and New Horizons adjusts its pointing.
Here: to help you, I’ve picked out some of the stars. Concentrate, and you may see some more; I’m pretty sure there are lots of fainter ones in the upper part of the animation.
(At the risk of making things too complicated, I'll mention that actually, New Horizons used a second trick, besides long exposure, to make faint things more visible in these eclipse images. They binned the data, averaging together 4-by-4 groups of pixels, and so returning the images only 256 pixels square instead of 1024. By binning the data, they get 16 times fewer pixels, but they make the camera that much more sensitive, less affected by random noise. Binning the data also prevents images from blurring from spacecraft motion during long exposures.)
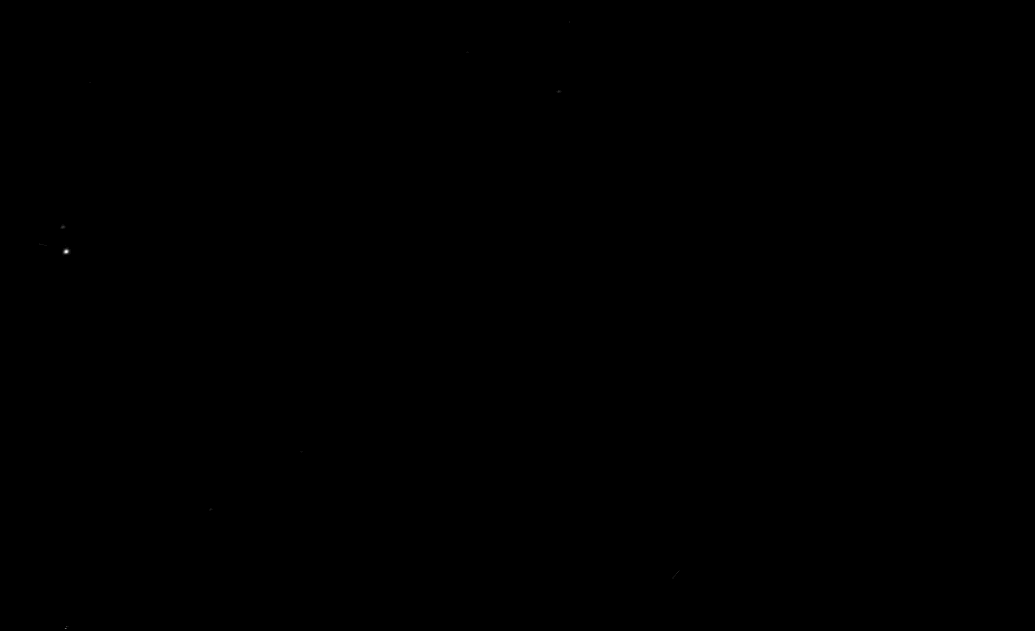
As New Horizons approached Pluto, stars were still visible in their relatively long exposures. You can still see stars in these approach animations; below, amateur Matthew Earl used the stars to align the images and reveal the funky dumbbell rotation of Pluto and Charon.
So next time you wonder why stars aren't visible, ask instead: what in the image is so bright that I can't see the stars?
Protect Our Shared Future
You help us defend humanity and prevent asteroid impacts. Donate now to become a Planetary Defender!
Donate