Emily Lakdawalla • Apr 23, 2013
One of my favorite image processing tricks: colorizing images
I thought I'd write a quick post on one of my favorite image processing tricks. It may be a stretch to call it a "trick" since it's actually a widely used technique with planetary data sets, but the results can seem magical.
A while ago saw some neat photos of Saturn's northern hexagon on the Cassini raw images website. (The whorl at the center is the one in this amazing series of photos.) They even included frames taken through the red, green, and blue filters necessary to make an approximately true color image. But when I went to download them, I realized that the images had been returned to Earth at a quarter of their full resolution, so were only 256 pixels square.
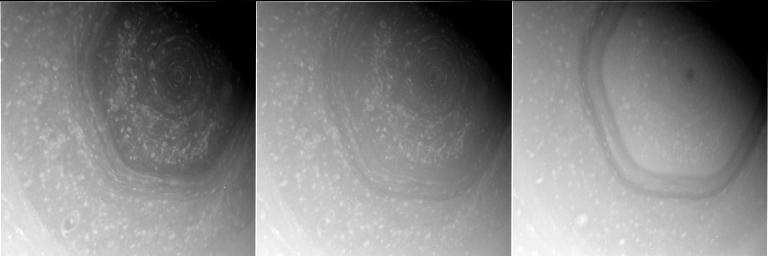
Here's the unimpressive product of combining those (note I also rotated it to put north up):
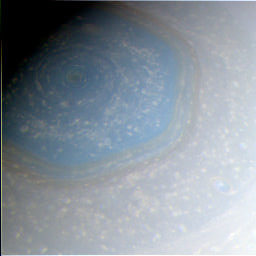
Looking through the rest of the set, I found that images taken through one filter -- the CB2 filter, which is an infrared one -- had been returned at their full resolution. The embedded version here isn't quite at its full resolution; click to enlarge.
Which is all I need to turn the above unimpressive picture into this picture. (I did do some post-processing color fiddling.)
It's very easy to do if you have photo editing software that can change the color mode of an image. I use Photoshop but it's possible with GIMP and other software.
First, you need to enlarge the color image to match the resolution of the sharp black-and-white photo. In this case, I enlarged my color image by 400%. This gave it more pixels, but of course it can't make the image any sharper than it was before. Unlike on CSI, you don't magically acquire more detail when you enormously enlarge a photo.
Now go to Image > Mode > and select "Lab color". If you look at the image's channels, you'll see that there are three, but instead of red, green, and blue, you now have "Lightness", "a", and "b". Here's what those channels look like:
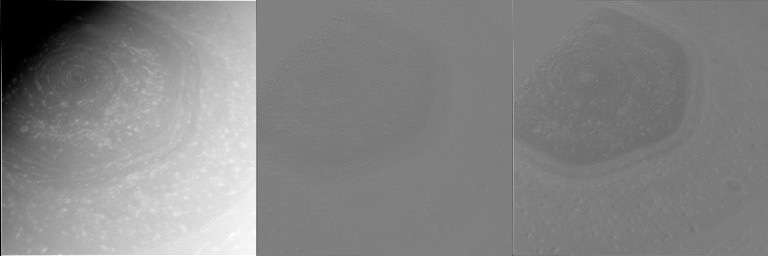
I'll let Wikipedia explain what Lab color mode is. Notice how much the Lightness channel looks like the black-and-white photo taken through the CB2 filter? We're going to take advantage of that. I just copy and paste the high-resolution CB2 image into the Lightness channel of the color image. That's it. Convert the color mode back to RGB and I'm done.
(Another, nondestructive way to do this in Photoshop is to have the high-res black-and-white image as one layer, then paste the color image into a second layer, and set its blending mode to Color.)
Why does this work so well? Remember that images are a form of data. Under most circumstances, in a sunlit scene, most of the data content of a photo has to do with how brightly lit the pixels are (how many total photons they received). Things that are in shadow -- like the nightside of Saturn here -- are going to be dark no matter what filter you have chosen to put in front of the camera.
You can see this at work in the separation of the Lab color filters. The lightness channel captures most of the variation in pixel values. There's very little variation in pixel value in the "a" and "b" channels, which carry the color information. (To be more specific, the "a" channel describes the position of a pixel's color between red and magenta endpoints, while the "b" channel describes the position of a pixel's color between yellow and blue endpoints. Since the image is yellowish-bluish, most of the information about the image's color can be found in the "b" channel, and the "a" channel is pretty bland.)
Space missions take advantage of this all the time. If you take and then return to Earth full-resolution images of a target through many different filters, there's a lot of redundant information in those images in the patterns of light and shadow that are the same everywhere. Since bandwidth is often a limitation in how much data you can get back from a mission, it's prudent to find ways to reduce that redundancy and maximize the information content of the data that you do get back.
Space missions take several different approaches to this redundancy reduction. The one that Cassini is using here is to return full-resolution images taken through one filter (usually the clear filter for icy moon targets, or the CB2 and/or a methane filter for Saturn), and then return reduced-size versions of the other filter images. The original images are 1024 pixels square; by sending the color ones back at only 256 pixels square, they save a factor of 16 or so on data volume. Mars Express uses the same technique for all of its color photos: red, green, and blue data has about one-quarter the resolution of their highest-resolution panchromatic channel data. So I employed the same colorizing trick to make the color photos of the fretted terrain on Mars that I posted last week, applying lower-resolution color to higher-resolution black-and-white images.
The Voyagers used this method, after a fashion. Most of their highest-resolution images of icy moons were taken through a clear filter, particularly mosaics. That's because Voyager got high resolution by flying close by these moons. Once they needed more than one image to cover the visible disk, they usually quit switching filters and just stuck with clear-filter images. To colorize Voyager photos, you usually have to use color-filter images taken from a greater distance away, which have lower resolution. (This isn't easy to do, because spacecraft motion makes the moons appear to rotate as Voyager gets closer; you have to work to make the geometry of the color data match the black-and-white data by warping or reprojecting the color images.)
Some spacecraft, like MESSENGER, are designed around the idea of sending back lower-resolution color data. MESSENGER has two cameras. The narrow-angle one, which takes the most detailed images, is a black-and-white camera. The much lower-resolution wide-angle camera is the one with color filters. With MESSENGER data you can only get highest-resolution color photos by colorizing narrow-angle camera data with the wide-angle camera data.
An approach that the Mars Exploration Rover mission uses a lot is to return everything at full resolution, but to employ more severe compression on all but one of the images. There are compression artifacts in the color data, but those are ameliorated by using them to colorize the less-compressed image. This method is actually related to how JPEG compression works.
Colorizing images is one of my favorite things to do, because of the way it can bring gray data to life. What I described above is using real (though lower-resolution) information to colorize the images. Of course it's possible to employ a similar technique to colorize black-and-white images where no color information actually exists. Here's such an artificially colorized photo. Colorizing isn't just for planets!


 Explore Worlds
 Find Life
 Defend Earth