
 Explore Worlds
 Find Life
 Defend Earth


Curiosity sol 38 update: arm tests done, on the road again, and an important question answered
Written by
Emily Lakdawalla
September 14, 2012
As I write, morning has broken for Curiosity's sol 39. Curiosity has wrapped up the second major phase of commissioning and testing. She spent sols 30 through 37 working out the robotic arm and the two instruments attached to it, the Hand Lens Imager (MAHLI) and Alpha Particle X-Ray Spectrometer (APXS). As of sol 38 she's on the road toward Glenelg again, and put 32 more meters on the odometer.
The Commissioning Activity Period 2 checkouts produced a lot of fun self-shots. The two Mastcams were used to examine every nook and cranny of the robotic arm turret, and to watch the three sample hatches open and close on the rover deck. And MAHLI took close looks at the sample inlet ports as well as at its own calibration target, the APXS calibration target, and other bits and pieces of the rover important for science and sample handling.
I'll walk you through some of these various devices, with some help (a ways down the post) from Daniel Limonadi, who wrote a great four-part series for this blog about how the sample handling systems work. And if you stick through the post to the end, he answers a funny question.
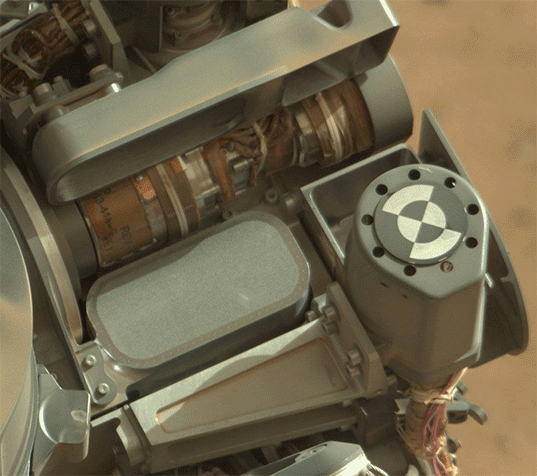
To begin, here is a map showing you where the turret's main parts are. This photo, like all of the rest of the photos that I'll be showing in this blog entry, was taken by one of the two Mastcams (in this case, the wider-angle, 34-millimeter, left-eye one). All the images have Mars soil in the background, which is a fun backdrop! This photo shows the "top" of the turret. What I mean by "top" is that it's the side of the turret that faces skyward when it is parked on the robot's left shoulder for driving. You can see that the drill occupies much of the mass of the turret, and that the other tools are on the sides. Two of the tools are science instruments: the Mars Hand Lens Imager or MAHLI, and the Alpha Particle X-ray Spectrometer or APXS. Then there's the Dust Removal Tool or DRT, and the sampling and portioning hardware called the Collection and Handling for In situ Martian Rock Analysis tool, or CHIMRA (pronounced "chimera").

Okay, let's look at these one at a time. First you have the science instruments. Both the MAHLI and the APXS scientists had a terrifying month of Mars surface operations before they got to see these photos that showed them that the instruments had survived the rock-spattering landing with no visible surface damage. First, here's the MAHLI, beginning with a straight-on view and then looking at it from a couple of sides:

Next, here's the APXS. The top image gives a particularly good view of the three springy wire basket thingies that mechanically isolate the APXS from the turret. They do that to prevent the vibration of the drill and CHIMRA tools from shaking up the sensitive science instruments too much. You can see that MAHLI is also mechanically isolated in the same way.

So that's the science instruments. One key tool that helps both of these is the Dust Removal Tool, a fancy name for a motorized pair of wire brushes:

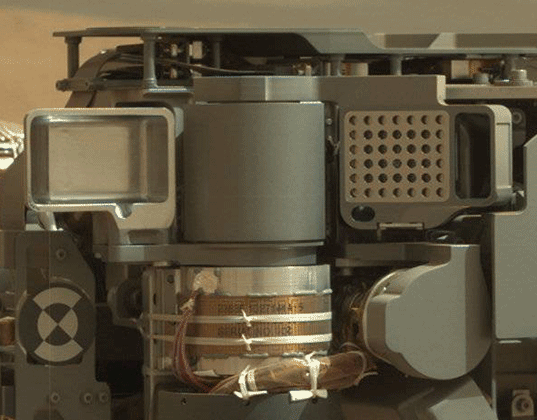
Here's the business end of the turret: the percussive drill. You can see that it's not a hollow bit of the sort that you'd use if you were interested in obtaining a core sample. It's a spade bit that'll hammer and scrape at a rock as it spins, producing a fine powder. Some of the powder will be augered up and into the gold tube you can see in the top photo, delivering it to CHIMRA. The two blunt-ended "fingers" protruding on either side of the bit are what Curiosity will use to hold the bit in position as it drills. Curiosity will place the arm against a rock and then press down with a fixed, carefully selected amount of force, using the knubbly tips of those "fingers" to hold the turret steady. The engineers call this "preloading" the arm.

This diagram explains the drill bit's parts:

Here is the CHIMRA sieving and portioning tool as seen from "underneath". It's an amazingly complex motorized collection of chambers, tubes, sieves, hoppers, and hinges. The flat plate in the top center with the U-shaped strip of metal mounted to it is the end of CHIMRA, the tube through which it will deliver samples into Chemin. I have some animations of CHIMRA parts moving below, keep scrolling...

Below are two animations showing tests of some of CHIMRA's moving parts. I asked Dan Limonadi to explain what we were seeing in these animations. He said:
These sol 32 Mastcam images of the turret are part of the extensive turret photo inspection campaign done during the Characterization Assessment Phase Part 2 (CAP-2). The objective of this photo inspection activity is to document the beginning of mission state of the turret hardware. For the internal surfaces we are documenting the cleanliness level via pictures - i.e. is the hardware still visibly clean after landing? These particular images show some of the internal surfaces of the CHIMRA mechanism on the turret. The top pair of images show the 150-micrometer sieve and parts of the 150-micrometer sample path inside CHIMRA in two different poses. The bottom pair of images shows the scoop in its fully open position, and the scoop 1-millimeter sieve hardware in two different poses, plus the internal surfaces behind the sieves. Both the 150-micrometer sieve and the 1-millimeter sieve hardware is mounted on motorized swing arms that wind up an internal spring mechanism, which releases at a certain point in the range of motion and "thwacks" (high-g impact driven by the spring) the sieves against hardstops in order to clean the sieves of material that might be blinding them. Testing has shown this to be a very effective way of cleaning the sieves inside CHIMRA in order to support the many sample processing operations we have to do.
If you haven't already, you should read Dan's 4-part series explaining what all of these parts are designed to do. It begins here.
There were plenty of other images I could animate, but I ran out of time (and, frankly, energy). I'll probably post a lot more photos of the SAM and CheMin instrument inlets and so forth when Curiosity stops to begin to work with this sampling hardware.
As a postscript, during the first Google+ Hangout I did after Curiosity landed, somebody asked me what CheMin and SAM do with the samples in their cups once they're done analyzing them. Does Curiosity....excrete them somehow? I didn't know the answer to this question, so I asked Dan and he said:
Good question - no, we don't relieve ourselves of sample onto the surface of Mars ;-) CheMin has an internal trashcan located at the bottom of the instrument, underneath the sample wheel which rotates the 32 different sample cell around inside the instrument. This sample wheel basically either moves a cell into position under the funnel to receive new sample (the receive new sample location is the same location where the X-ray beam shines through the sample), or moves the sample cell so that it is hanging upside down above the trashcan. When we are done analyzing a sample the sample wheel rotates to bring the particular sample cell in question over the trashcan and then we buzz the cell with its piezos to get the dirt out and allow it to be re-used in the future. Some materials might be hard to clean out of a cell. We have enough blank cells to get well past the prime mission before we have to start reusing them. The trashcan volume is huge - enough for more than 400 samples. SAM also has a trashcan, but this is used under the SAM funnels when we are NOT trying to drop sample off for science - it seals against the bottom of the funnels and helps keep contamination out of the interior of SAM. If we want to drop "cleaning" samples or practice samples into SAM then we can drop off to the trashcan. For the regular SAM cups that go into the oven, recall that most of the material in a sample is not volatile, not even at 1000 C or so... so, after being baked there will be a little more room inside that cup, but the dirt will still take up a good amount of volume. The SAM cups are sized to handle about 8 or 9 nominal sample drop off volumes, so even for SAM cups we can re-use them if needed. SAM has 74 cups though, and even more than CheMin, it is unlikely we'd be re-using any of them within the first 2 years of the mission... maybe well into the extended mission.