Emily Lakdawalla • Sep 01, 2010
Getting to the real science image data: It's not that hard!
If I have to, I will drag reluctant people one at a time to plunge into NASA's Planetary Data System. The PDS, as I've mentioned before, is the repository for space missions' science data; it's the public clearinghouse, the Library of Congress for data, into which every person on Earth is invited to explore the solar system. Few people on Earth do so, however, because the PDS is designed for scientists' use and so is intimidating and sometimes even incomprehensible to amateurs. But, every day, the folks at the PDS' various Nodes are working diligently to make my previous sentence less and less true, and I am trying to encourage more people to find the gems that are hidden within the archives using online search tools.
Over the last few days on unmannedspaceflight.com I've been having a constructive argument with Cumbrian Sky blogger Stuart Atkinson about this topic, and I'm happy to say that I've finally won, dragging him -- kicking and screaming all the way -- into the PDS, as this blog entry shows. Hopefully, by recounting the tale, I can drag a few of you readers along too.
For six years Stu has done lots of work with the rovers' raw images, most recently using them to illustrate his chronicle of Opportunity's progress toward Endeavour crater, which is great; that's what the raw images are for, to allow us to ride along on the journey. But they have drawbacks.
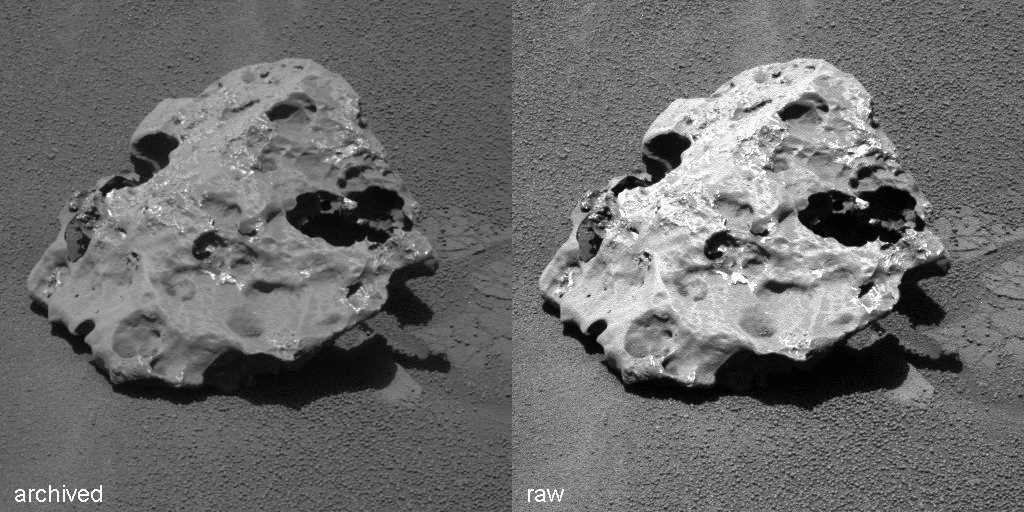
To explain: raw images are posted to the Mars Exploration Rover mission website within hours of their acquisition on Earth. We call them "raw" because they are, as space images go, very undercooked; virtually nothing has been done to them to clean up the blemishes that result from dust on the camera optics and other sources of noise and distortion. To make them easier for the public to read, they are converted to JPEG format (which makes file sizes small, but which reduces the quality of the images, blurring sharp edges and fuzzing colors). They are also "stretched" -- the contrast of the images, which may start out very subdued, is jacked up to make the lightest pixels pure white and the darkest pixels pure black. These make the images unusable (or, if not unusable, very poor) for science, while maintaining their utility as snapshots from the mission -- a perfect compromise to allow the public to follow along with what's going on, while permitting the mission scientists their few months of proprietary use of their hard-won data.
But it's a compromise, and it does seriously affect the quality of the images. To illustrate this point, here's a blink animation comparing the same Opportunity photo in its raw and archived versions.

So when Stu posted some work he'd done stacking and processing some older images, taken in October of last year. I objected: why do all this processing work with the cruddy raw JPEGs? His reply, essentially, was that he didn't know how to get to the archived data, and didn't think he was capable of doing it anyway. I argued he was wrong, and set about determining the path to archived data in a friendly format using the fewest number of clicks and nothing more than a browser. Following that path, Stu immediately got results -- which did prove I was right, but more importantly, proved that someone who didn't think he was capable of dealing with the archived data could, in fact, not only browse and download it, but process it using the skills he already had:

Here's the path I led Stu down: For the rovers, it requires as few as four clicks of the mouse and, optionally, a typed number.
- Go to the PDS Imaging Node.
- Click on the link at left to Planetary Image Atlas.
- Under the "Select Mission" window at top left, click "Mars Exploration Rover."
- Under the "Image Type" thingy in the center, click "Regular."
- If you know what sol you're looking for, putting the sol number in both boxes of "Planet Day Number" will get you to your desired results much faster. If you don't specify, the Atlas will just retrieve the 1000 most recent results. Try sol 2037 for Mackinac.
- Under "Product Search" on the left, click "Get results."
- The Atlas will chug for a while and then spit out a results page. Clicking on any image thumbnail will get you to a browse view. From that view, you can download the image in TIFF, PNG, GIF, or JPEG formats. (But if you've come this far, for God's sake don't pick JPEG.)
That's it! You've got archived data. The versions you can get through that browse-and-click interface do have an automatic contrast stretch applied, but it's not nearly as aggressive as the one that's used on the raw images website. If you want images without a contrast stretch, you'll have to use the little download links, download images in IMG format, and figure out how to process them, which is not very hard but which is not something I'll make you newbies do today. Because you're at the Imaging Node, a similar set of clicks will get you straight to lots of other spacecraft image data. Try it out and explore the solar system! I suggest checking the Viking Orbiter archive of Phobos or Deimos images, or try Cassini images of Calypso or Phoebe, or LCROSS images of its departing Centaur stage, etc....
A few tips and tricks you can do with the Planetary Image Atlas Search Tool for rover images:
- Use the "Get Results" button under Product Search to figure out how many items your search will produce, and fiddle with entries in the search tool until you get it under 1,000 (which is the most search results the Atlas will show you). Quick ways to reduce search result numbers are to select only one rover (the checkbox on the right by "Instrument Host ID"), and to choose which camera you are interested in (on the left, under "Select Instrument(s)").
- The raw website still has value; it's quicker to browse, so you can use it to identify an image or image sequence that you're interested in, determine what sol it was taken on, and plug that sol number into the Atlas Search Tool to sharply reduce the number of search results.
- The files all have names that are 27 characters long. Here's a reference on decoding those filenames, and a Web tool that'll do it for you, but you can get all that information and more if you click the little piece-of-paper icon next to each thumbnail in the Atlas Search Results, which will show you the file's full label.
- The step to click "Regular" under "Image Type" is not strictly necessary; it removes duplicate copies of images that have had different types of processing performed on them, reducing the number of search results by a lot. You may be interested in some of those other versions; experiment with the Image Type and Product Type dropdown menus. You can also sort through these types using the Data Set ID dropdown under the "Product" tab.
- If what you are looking for is image sequences where there are the images necessary to make color views, you want images taken through the rover's L4, L5, and L6 filters (red, green, and blue, in that order). You can go to the Instrument tab in the Atlas Search Tool to select the Pancam Filter Names you're interested in. There are lots of L5s that are not accompanied by L4s and L6s, but L4s are almost never taken unless they are part of a full-color sequence containing both L5s and L6s. So if I want to find L456 sets, an efficient route is to search on L4 only, identify the sol number of an image that looks good, then do a search on all images within that sol.
Why do I care so much about this? Because the pictures speak for the missions, and the archived data just looks so much nicer than the raw JPEGs. Use the raw images to follow the everyday happenings on the mission -- but use the real data, please, if you want to put the rovers' best wheels forward.
The Time is Now.
As a Planetary Defender, you’re part of our mission to decrease the risk of Earth being hit by an asteroid or comet.
Donate Today

 Explore Worlds
 Find Life
 Defend Earth

