Emily Lakdawalla • Sep 19, 2014
More jets from Rosetta's comet!
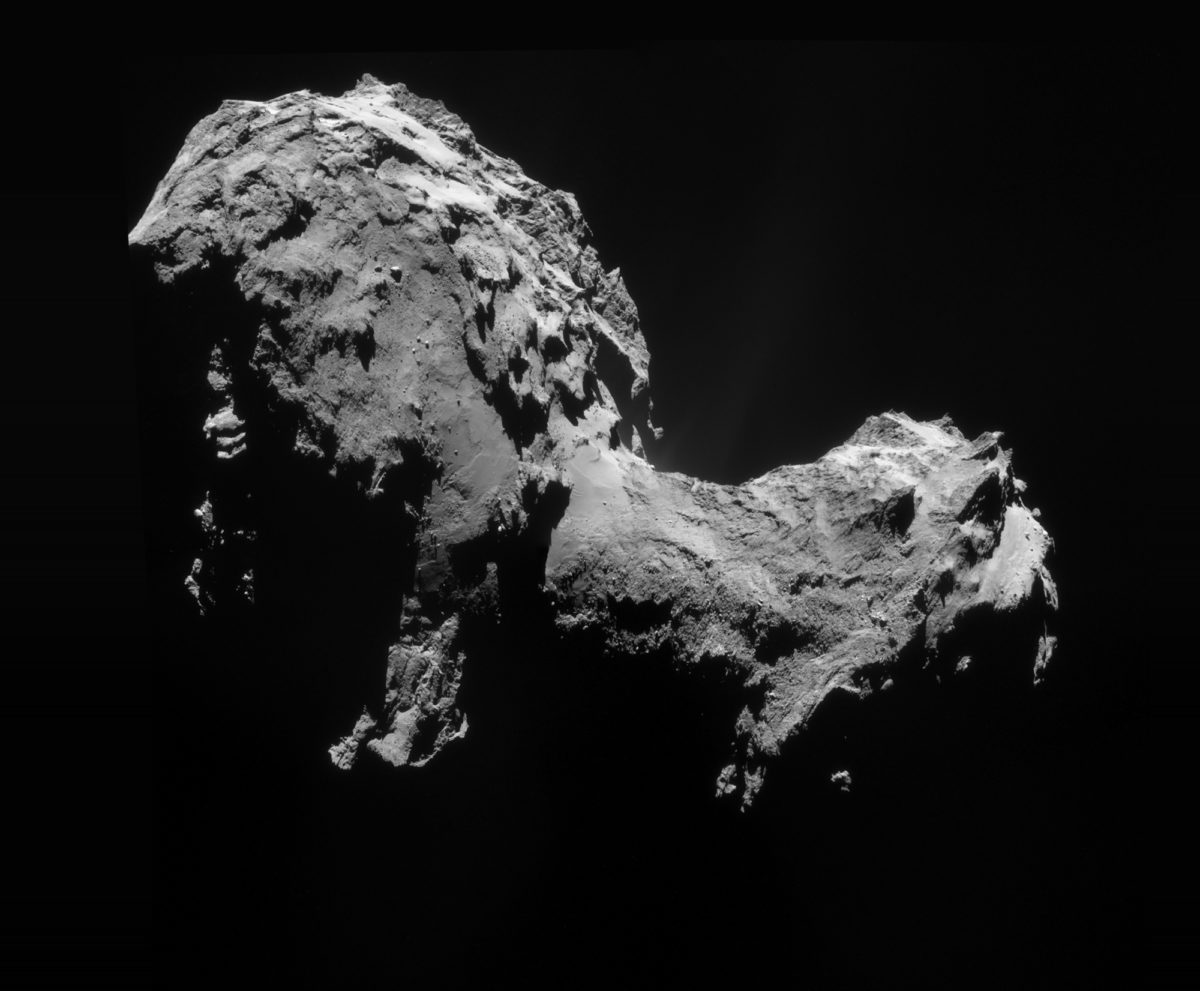
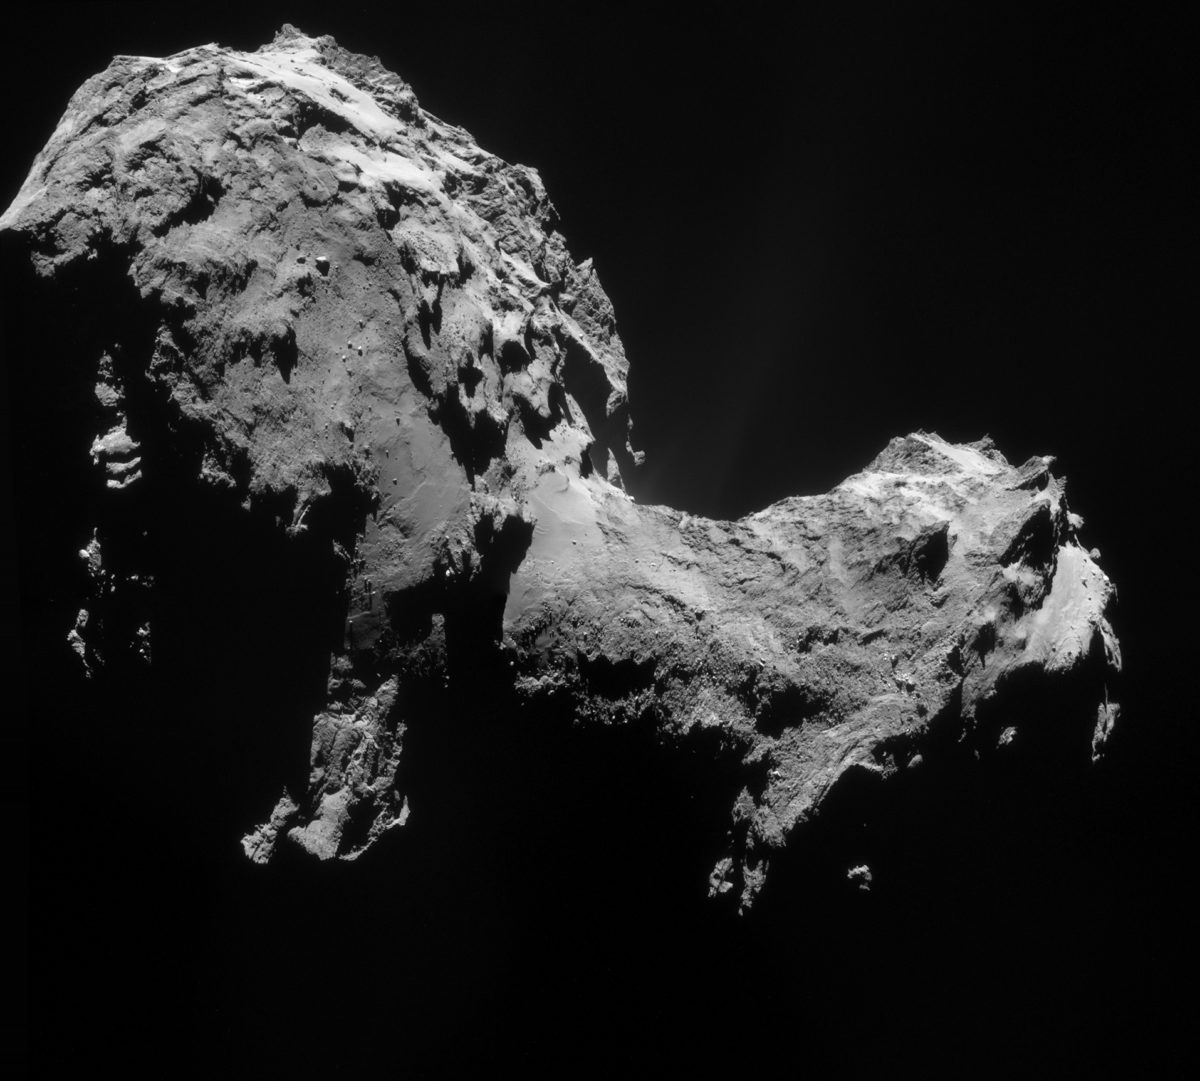
Here's a lovely new view of Rosetta's comet, taken on September 19 (yes, today!). I have a new technique for processing Rosetta pictures to get the most out of the jets -- I'll explain below. First, enjoy this glorious new photo! I particularly like how the shadows on the part of the comet that is closer to the viewer are black black black, but if you look at the shadowed regions behind the neck you can see they are less black because we are looking at them through a faint comet jet.

People commonly request that I add scale bars to Rosetta photos, but I couldn't bring myself to clutter this image with one, so I measured and can tell you that as seen in this image the comet measures 4.8 kilometers, end to end, at its widest point.
If you tweak the brightness of this image, you can see at least two strong jets emanating from the neck -- maybe more -- and also evidence for more material issuing from the sunlit "body" of the comet.
I have a new technique to process these images: I'm flatfielding them performing dark-frame subtraction. Let me explain what that means and why and how I'm doing it.
ESA has now released 5 four-image sets of Navcam images of the comet. When you increase the brightness of these images to look for jets, you also reveal a vertical striping in the backgrounds of the images:
Initially, I was getting rid of this vertical striping using the technique I described for removing interline transfer smear in MAHLI images. But the results weren't perfect -- it would overcorrect in some places and undercorrect in others. This week, I discovered something about the Rosetta NavCam vertical striping that suggested a different approach. I realized that the vertical stripes were in exactly the same locations at pretty much the same intensities in all the released NavCam images. Below is a flicker-gif comparison of the same regions of two NavCam images taken on different days. You can see that the stripes are in the same exact positions. Not only that -- you can also see that there is a bunch of other speckly schmutz in the exact same position between the two images. (There are a few bright spots that appear in one image and not another: those are mostly the marks of stray cosmic rays hitting the detector.)
If most of the stuff marring the view of the jets in NavCam images is in exactly the same place from one image to the next, then what I want to do is to make a model of all of that junk -- basically, a picture that contains junk, and nothing else -- and then subtract it from the NavCam images to remove the junk and leave behind the good stuff. What does it mean to subtract one image from another? An image is nothing more than a table of data -- little square cells with numbers in them representing pixel values. A bright pixel has a high number, a dark pixel a low number. If I take an image and subtract my model of all of the junk, I'm taking away the contribution that the junk makes to the pixel value, leaving behind the signal. In theory, anyway.
How to make a model of where all of the junk is? It helps that there is a lot of black space in the Rosetta images. I stacked up a whole bunch of them, and masked out the parts that contained comet or obvious comet jets. I selected a handful of images in which space seemed to be blackest, throwing out ones where the background levels were increased too much by coma. (If I left those in, my flat field dark frame would overcorrect images, subtracting away more signal than they should.) Where there was overlap between images, I cloned from one layer to another to remove cosmic ray hits. Then I averaged layers together to make a single image, my model of the stripes and specks in all NavCam images. (My process for this averaging was somewhat unscientific, but it was good enough for the moment. I'll do a better job of this when I can get my hands on high-quality archival data rather than the raw JPEGs I'm working with at present.) Here's a screen cap from Photoshop showing how the layers contributed to my model:
It's not perfect, but it does a remarkably good job of cleaning up the NavCam images. To apply the dark frame, I paste it as a layer over the NavCam image I want to clean up, and then set the blending mode of the dark frame image to "difference." Here is a look at how it cleans up the plumes in one of the September 19 images. The "before" image is brighter than the "after" image. The stripes are mostly gone in the "after" image, as are many of the specks.
If you'd like to have a go at cleaning up NavCam images, here's my derived dark frame! It is a 16-bit PNG; I recommend converting 8-bit images to 16-bit mode before trying to hunt for pretty detail in the darkest regions of images.
Edit: As noted in the comments, I confused the term "dark frame" with "flat field" when I first posted this. Here is an explainer on what the two terms mean.
The Time is Now.
As a Planetary Defender, you’re part of our mission to decrease the risk of Earth being hit by an asteroid or comet.
Donate Today

 Explore Worlds
 Find Life
 Defend Earth


