
 Explore Worlds
 Find Life
 Defend Earth


Image processing trick: Removing interline transfer smear from Curiosity photos
Written by
Emily Lakdawalla
May 1, 2014
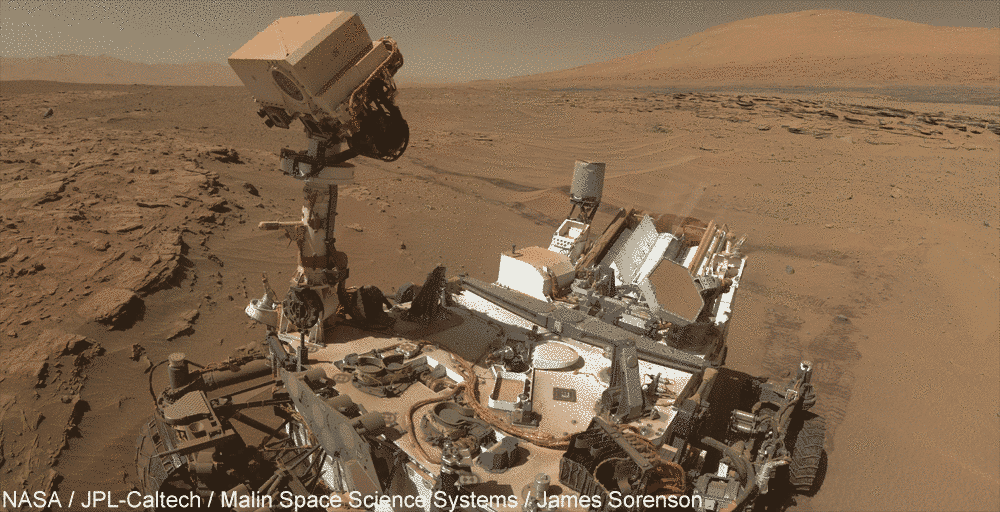
Over the weekend, Curiosity took a set of 75 photos with her arm-mounted MAHLI camera, enough to produce a spectacular new self-portrait of the rover sitting at the Kimberley, prepared to drill at Windjana. I absolutely love this new self-portrait; it contains everything you'd want. There's the rover, Mount Sharp, beautiful rover tracks, beautiful outcrop, a mound in the middle distance, and the walls of Gale crater quite clear in the background. They even shot it with the head in two different positions, so you can choose to assemble it either with the head facing you or gazing down at the outcrop. I am pretty sure some version of it will end up on the cover of my book.
Here are the component images for the mosaic. Reminds me of a David Hockney collage! I wrote an earlier blog entry about how Curiosity takes these self-portraits.

I'm not going to post a fully-assembled version here yet, because it's still a work in progress. I want to give the amateur -- and professional! -- community more time to produce what I think will be the definitive version. In the meantime, here is a partial version that I made for my desktop:

The folks over at unmannedspaceflight.com have been working on it, with a variety of different results. My favorite, so far, is this one by Doug Ellison. One of the reason's I like Doug's so much is because he's made the effort to correct a problem with one of the original frames.
You can see the problem in this super-cool animated GIF that James Sorenson put together, an animation of the head in its two positions.
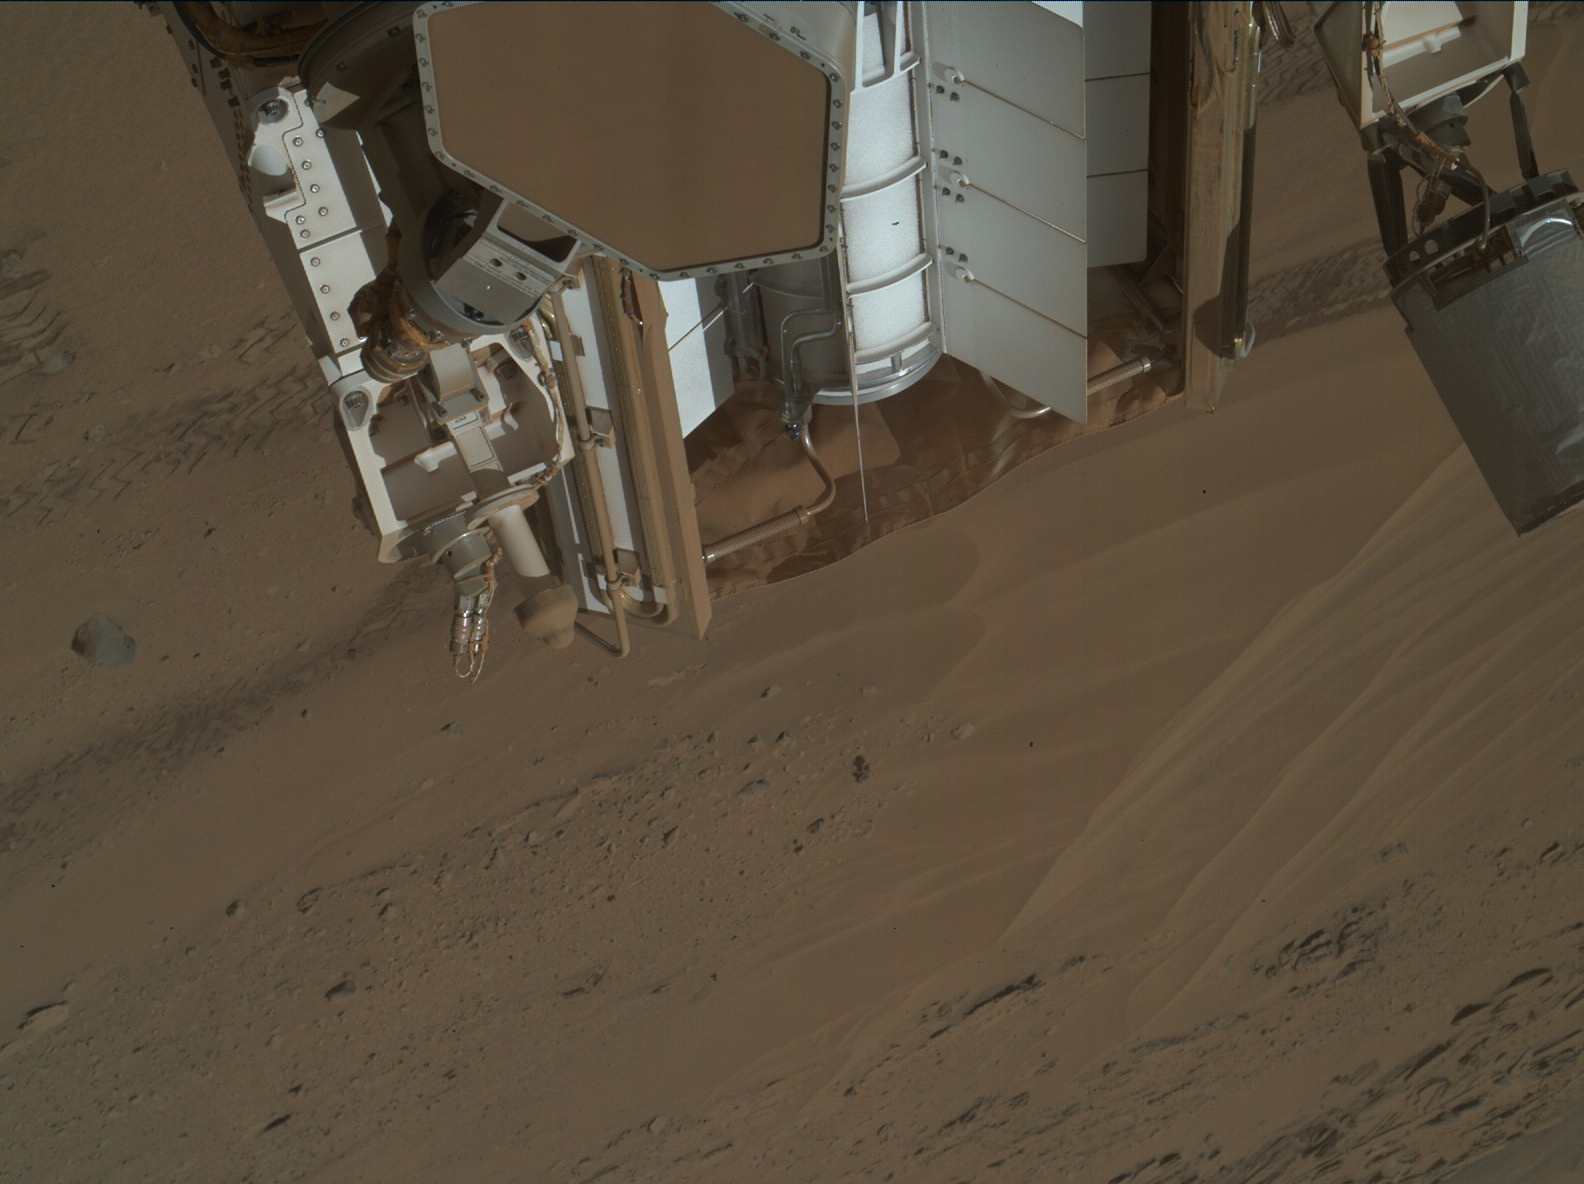
If you look at the back end of the rover, you'll see a blur, as though the rover were racing toward you. That's not motion blur; it's something called interline transfer smear. Here is a great explanation of interline transfer smear from a company that builds cameras (though not the Curiosity cameras, those were made by Malin Space Science Systems):
On the interline transfer CCDs used in many Point Grey cameras, each pixel consists of a light sensitive area, called the photosensor, and a light-shielded area, called the vertical transfer register. The vertical transfer register is used to shift the charge out of the photosensor and off of the sensor. Although vertical transfer cells are approximately 100,000 times less sensitive than the light sensitive region, photons may still tunnel into this area, especially when exposed to very bright light. This tunneling, or leaking, is the source of smear.
During image readout, image pixels are shifted vertically downard, row by row, through the vertical transfer cells to the readout register. If there is any leakage of charge into an area of the vertical transfer register, it will be picked up and shifted downward, so that every pixel above and below the area will contain this extra charge. The result is a relatively bright vertical stripe across the entire image.
The smear in the Curiosity self-portrait is almost entirely contained on a single frame of the mosaic:

It's fairly easy to use Photoshop to remove this smear from this frame before you assemble the mosaic. Here's a link to a de-smeared version, and here is a before-and-after comparison:
I was having a hard time putting an explanation in words, so I just decided to record it. It worked even though I had to keep telling my computer to stop worrying about not having enough resources. Enjoy!
Image processing: fixing interline transfer smear An explainer on using Photoshop to remove interline transfer smear from MAHLI or Mastcam image frames.
Note: one step you may not get in the tutorial is how I link the adjustment layer just to the layer I'm subtracting from the original. After you add an adjustment layer, Control-click on the line between the adjustment layer and the layer immediately below it, and that will make the adjustment layer apply only to the layer immediately below it rather than to the entire image, as would be the default.
Protect Our Shared Future
You help us defend humanity and prevent asteroid impacts. Donate now to become a Planetary Defender!
Donate