
 Explore Worlds
 Find Life
 Defend Earth


The Making of Martian Clouds in Motion: Part 1, working with Mars Express HRSC data
Written by
Emily Lakdawalla
August 22, 2011
Last Friday I posted an awesome video of Martian clouds in motion. This week I'll tell you how I made it. The how-to is split up into two parts. The first, today, is how to access Mars Express HRSC image data and process it into the individual animation frames, from which you can make an animated GIF. The second, which I'll post tomorrow, explains how to tween the frames into a smooth animation. Lest I disappoint Mac and Linux users I should mention that the software tools I'll use in part 2 only work under Windows; I'm sure there are similar tools available for other platforms but I don't know what they are. But part 1 will work on any machine. I use Photoshop but GIMP will work fine for image processing. This post assumes that you are already familiar with the basics of space image processing, which I've described in previous tutorials. If you aren't, go check out my tutorials first!
Before I get in to the details of the image processing, I should give a little introduction to HRSC. HRSC stands for High Resolution Stereo Camera, the main camera aboard ESA's Mars Express orbiter. HRSC is unusual among Mars-orbiting cameras because its nine detectors are pointed in different directions along the spacecraft's track. This is what gives HRSC its instantaneous stereo imaging capability; it images the same areas on Mars from different angles on the same overflight.

I explained how HRSC works in detail in a post in January. The crucial detail for animation buffs is that the different look directions mean that a given spot on Mars is observed at a slightly different time by each of the nine channels. The amount of time separating the first and last channel varies from observation to observation because Mars Express has an elliptical orbit, so its ground speed varies. For this particular movie, the time gap was pretty significant; fully two minutes separate the first and last images. Here is an animated gif of the nine images I used.
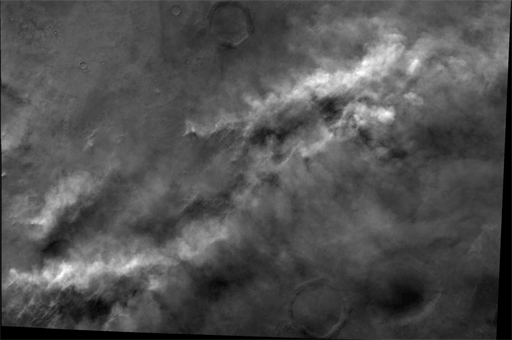
OK, now to get in to the data processing. The first thing you have to do is to get the data. In this case, I had a tip on which images I should look at to find moving clouds, so that shortened my work considerably. Marc Canale found them, he says, "the old fashioned way" -- by brute-force browsing. As with most modern space image data sets, HRSC data are archived in a special image format, but lower-resolution JPEG versions of all the images are archived in a "BROWSE" folder associated with the real data (Note: the ESA FTP site appeared to be temporarily down as I was writing this -- hopefully it will come back up shortly). He noticed that new data had been added to this folder, was perusing it to look for pretty pictures, and noticed lots of clouds appearing after orbit 8500.
But I didn't want the JPEG images, I wanted the nice original data. For that I went to the Mars Orbital Data Explorer at the Geosciences Node of NASA's Planetary Data System. (Yes, it's an ESA mission, but NASA maintains copies of ESA mission data and I like the PDS search tools better.) Under "Select One or More Desired Data Sets" I selected the Mars Express HRSC REFDR data set (map-projected data, in which the distortions caused by Mars Express' elliptical orbit have been corrected) and under "Filter by Time Range" I filtered by the time range from 2010-08-01 to the current day. Then it was my turn to browse data, clicking on image file names to bring up previews, looking after orbit 8500 and finding lots of observations that contained pretty-looking clouds. Once I found the observation I wanted, I downloaded the nine IMG files that represent the original data, one for each channel. If you look at the observation times for each image you'll see that they're taken in a strict time order having to do with their differing angles: Stereo 2 (S23), Red (RE3), Photometric 2 (P23), Blue (BL3), Nadir (ND3), Green (GR3), Photometric 1 (P13), Infrared (IR3), Stereo 1 (S13). (This order may also be reversed, depending upon whether the imaging is done on the ascending or descending branch of Mars Express' orbit.)
I converted the IMG files to PNG format using Björn Jónsson's IMG2PNG software. If you don't use a PC, check here for some other options for converting IMG files to ones that Photoshop can handle. There appear to be several GIMP plugins that allow opening of IMG files directly.
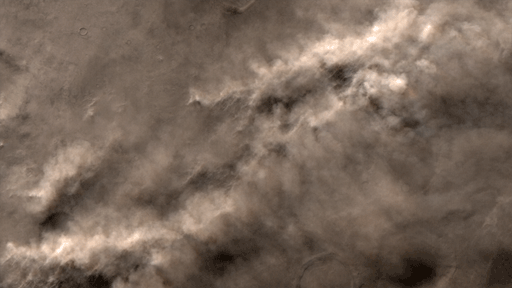
Once I had the files in Photoshop, I reduced the size of some of the images so that they all matched the size of the color channel images. The nadir-channel data (the files with the ND3 suffix) has the highest resolution of the nine HRSC channels. The forward- and backward-looking panchromatic channels (P13, P23, S13, S23) are lower-resolution by a factor of two, and the color channels (BL3, GR3, IR3, and RE3) are lower-resolution by a factor of four. It would also have been reasonable in this step for me to resample everything to the resolution of the P and S channels. I'm going to use the color-channel information to colorize the higher-resolution panchromatic-channel data, so it's no big deal that the color-filter data has lower resolution than the panchromatic data.
The next step is to use the red-, green-, and blue-channel data to make a color image. The time gaps between channels are cool because they allow us to see the motion of the clouds, but they are a pain because they make it very hard to make a color version of the image from the red, green, and blue-filter data without producing a lot of color-fringing artifacts. Still, with a bit of futzing with levels and use of the Image > Adjustments > Match color command in Photoshop, I managed to come up with this color view.

I then performed one of the easiest and most useful tricks in the space image processing biz, which is to colorize grayscale images. I used the color picture above to colorize the five panchromatic images in the observation. In the past I have done this by converting the color image to Lab color (Image > Mode > Lab color), copying a panchromatic image, and pasting it over the Lightness channel, then repeating the process for the other frames. I've since learned an easier way. With the five panchromatic images as separate layers in a Photoshop file, I paste the color image on top and set its blending mode to "color" in the Layers palette.
Colorizing the five grayscale images this way is a bit of a cheat, because the color information doesn't move at all during the five-frame animation, but because of the fuzziness of the clouds it works remarkably well. While I was doing this I cropped and resized my animation so that it has a standard size and aspect ratio, 1280 by 720. Here's an animated GIF of the five frames.
So the first task, generating the individual frames, is done.
One user has asked me how I figured out where on Mars this picture was taken. The easiest way to do that is to open one of the IMG files in your favorite text editor. There is an ASCII header at the start of the image file with lots of metadata describing the image. I usually take the latitude and longitude information from the header and go to that spot in Google Mars to figure out the regional context.
Stay tuned for Part 2, Tweening!
Protect Our Shared Future
You help us defend humanity and prevent asteroid impacts. Donate now to become a Planetary Defender!
Donate