
 Explore Worlds
 Find Life
 Defend Earth


Image processing trick: How to open PDS-formatted images in Photoshop
Written by
Emily Lakdawalla
March 7, 2018
This post will be a little arcane for most readers of this site, but I hope it will be a useful trick for those of you who are into spacecraft image processing. It explains how you can open archival NASA science data directly in Photoshop without needing to use any other tools. I am a big fan of the IMG2PNG tool created by Björn Jónsson, which can batch-convert large numbers of files at once. But when I just need to open one or a few images to do quick-and-dirty image processing, it's overkill, and there are some data sets it doesn't know how to handle.
Spacecraft image data exists in NASA's Planetary Data System (PDS) in several different formats. There's an archival data product that usually has a IMG extension. Often there is also a browse image product in JPG or PNG format. The JPGs or PNGs are usually not has high-quality as the IMG files -- JPG files because they have lossy compression, of course, but for either JPGs or PNGs there may have been an automatic contrast stretch applied, and 32- or 16-bit data gets reduced to 8 bits. If you have gone to the trouble of finding an image product in the PDS, you really ought to work with the archival-quality IMG file rather than the substandard JPG or PNG. (Note: there are a couple of data sets for which the PNGs are just as good, but that's another blog post.)
IMG is a very straightforward image format. It's just binary data, where every pixel is listed, in order, from left to right and top to bottom, using however many bytes are necessary for the bit depth of an image. So a 512-by-256-pixel image with 16-bit pixels will contain (512 x 256 x 2 =) 262,144 bytes of image data, with each pixel represented by the 2 bytes necessary to record the 16-bit number corresponding to the digital number for that pixel.
A size of 512 by 256 by 2 bytes describes the archival data for the Phoenix Robotic Arm Camera, which I picked for this post because the images are nice and small. You can find these images either at the Imaging Node or the Geosciences Node of the PDS. Download an image at random, like this one from Phoenix sol 7. Look at its file properties and you'll see it's pretty close to the expected 262,144 bytes, but not quite. The file size is actually 284,672 bytes. There are 22,528 bytes extra. Why?
You'll find the answer if you attempt to open the image in your favorite text editor. (I like TextPad.) Text editors don't do well at interpreting binary data. But open the image in a text editor anyway and you will find that before the gobbledygook of binary image data, there is an organized ASCII text header that contains information about the image. If you didn't know already what the format of the image was, you could have found it here. The 22,528 extra data bytes in the image file is this text header.
Here's a little segment of the header for the random Phoenix image:
There you go: it's a binary image, 256 lines tall, with 512 samples per line, and 16 bits per pixel.
OK, so how do you open this file in Photoshop? The first thing I have to do is to change the file extension from .IMG to .RAW. Then I can double-click the file or open it from the File menu. When I do that, I see a dialog that looks like this:
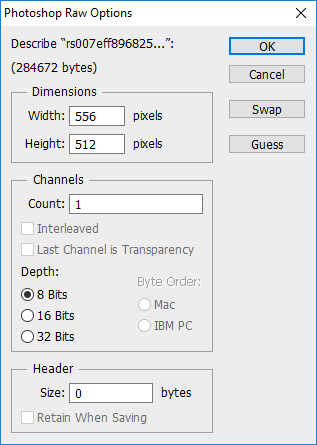
Because Photoshop doesn't know what a PDS header is or how to read it, it doesn't know the dimensions of the raw image. It does its best to guess, usually starting with a guess that is close to square. Here, it has guessed that the 284,672 bytes are in an image that is 556 pixels wide by 512 pixels tall with 8-bit pixels. If you click OK, the result does not look much like a space image.
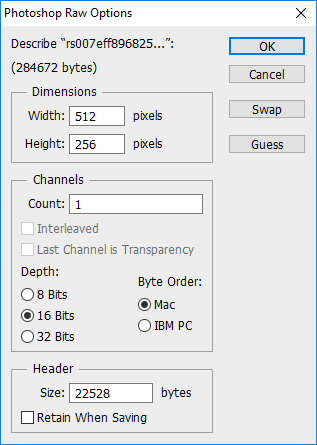
OK, let's try again, knowing what we know about the image. Here is how I have changed the "Photoshop Raw Options" dialog. I've set the width to 512 and the height to 256. The bit depth is 16 bits. That allows me to pick options under "Byte Order." I leave it on Mac (which does most-significant-byte-first byte order, specified as MSB in the header) rather than switching it to IBM PC (which would be least-significant-byte-first, LSB). And in the Header box, I put the size of the header I calculated by subtracting how many image bytes there are (256 x 512 x 2) from the actual file size.
The result is below. Hm. This doesn't look a lot better. It's the right size and shape, but it's all black. What gives?
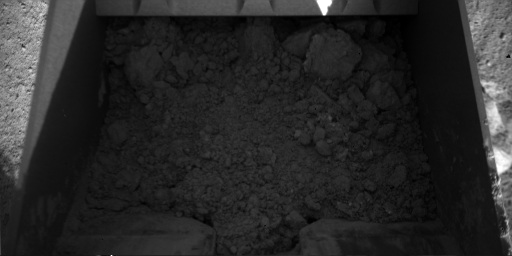
What's happening is that the Phoenix Robotic Arm Camera -- like many space cameras -- digitizes the data output from its detector at a bit depth of 12 bits per pixel, not 16 bits. But our computers on Earth prefer things in 8-bit chunks. So 12-bit space images have to be saved as 16-bit images. All the digital numbers for the image's pixels only go up to a maximum value of 2^12 instead of 2^16. The numbers are low compared to the full possible range, so they all look black.
To reveal the image, all we have to do is to stretch the contrast by a factor of 16 and we can use the full available range of pixel values. I do this by going into Image > Adjustments > Levels (or by hitting Ctrl-L) and setting the highest Input Level to 15. (Which is 256 divided by 16 minus 1, since the Photoshop levels scale goes from 0 to 255.)
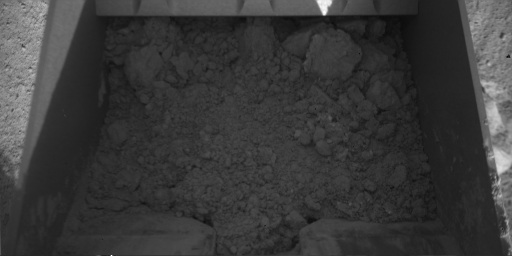
And now here's the result. Much better. We're looking inside Phoenix's scoop, at a healthy bite of Mars dirt.

It's still pretty dark, so I'm going to fiddle with the contrast some more, bringing in a little fill light to make the interior of the scoop more visible.
Once you have figured out the header size, image dimensions, and bit depth for one image of this type, if you try to open more images from the same camera, you'll find that Photoshop preserves those numbers in the Raw Options dialog box. As long as the file size is the same as the previous image, it'll automatically populate the box with the same numbers and settings.
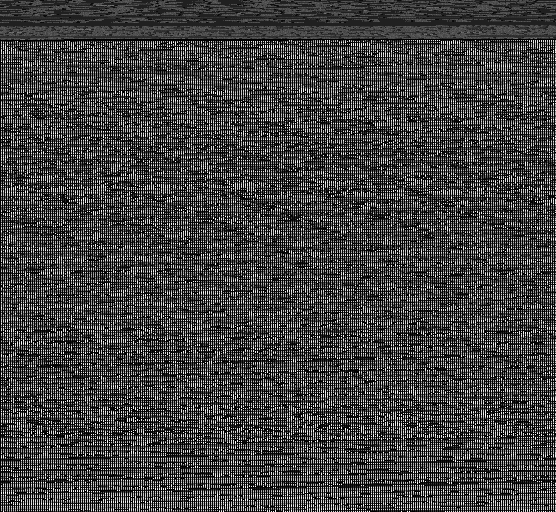
As an aside, even if I didn't have a header to tell me what the dimensions of the image were supposed to be, I could've gotten there eventually. The Photoshop guess of 556 by 512 was a pretty good start. 512 (2^7) is a round number that I would expect to see in an image dimension. So if I just swap Photoshop's guess -- specify 512 pixels wide and 556 pixels tall -- and open the image, I would've gotten this:
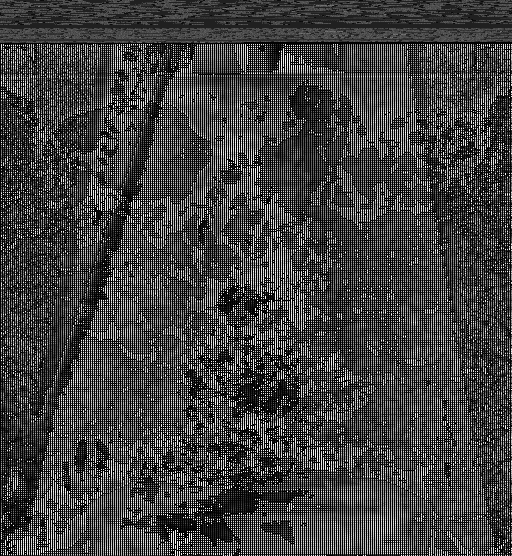
It still doesn't look right, but there's clearly some coherent signal in here. The vertical black striping along with the general sense that I'm looking at two images on top of each other tells me that I have the wrong bit depth. The next reasonable guess to make is to guess 16 bit instead of 8 bit, and reduce the vertical image dimensions (the one that is not 512) by half:
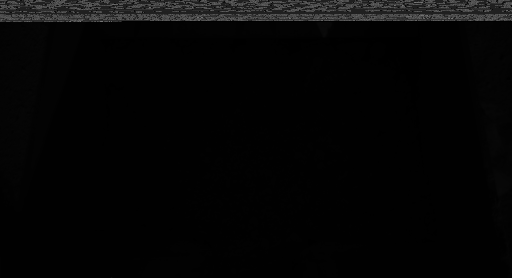
There's my black-looking image. When you're futzing with space image data, an apparently black image is usually a good sign. I can adjust the levels to take advantage of the full 16-bit range now. The garbage at the top is the text header, which I can just crop away.
I hope this tip is useful to some of you!
Note: I tried to figure out how to do this using GIMP, but GIMP seems to require raw image data to be multi-channel (RGB or RGBA), as far as I can tell. If somebody knows how to do this kind of thing with grayscale images in GIMP, I'd appreciate a lesson!
Protect Our Shared Future
You help us defend humanity and prevent asteroid impacts. Donate now to become a Planetary Defender!
Donate