
 Explore Worlds
 Find Life
 Defend Earth


Fun For All Ages: Creating and Mapping a Volcano

Written by
Mike Malaska
Scientist, Jet Propulsion Laboratory
August 18, 2012
Here’s a fun, cheap, and only slightly messy demonstration activity for kids of all ages, even 46-year-old kids. This is based on an activity originally found here. In the demonstration you will get to simulate how a series of lava layers can build up to make a volcanic construct such as a stratovolcano. These are like the volcanic constructs we see on Earth, Venus, Mars, the Moon and many of the other planets and moons in our solar system.

This makes a great rainy day activity, or one that can be done on the back deck on a sunny afternoon. Here’s what you’ll need:
- Flat piece of cardboard (an old shoe box works great!)
- 2 small shot glasses or other container that can hold 10-15 mL liquid
- Multicolor modeling clay (from a craft store – like Michael’s)
- Baking soda
- Water (1 L)
- Dish detergent
- Vinegar
- Marking pen
- Paper towels

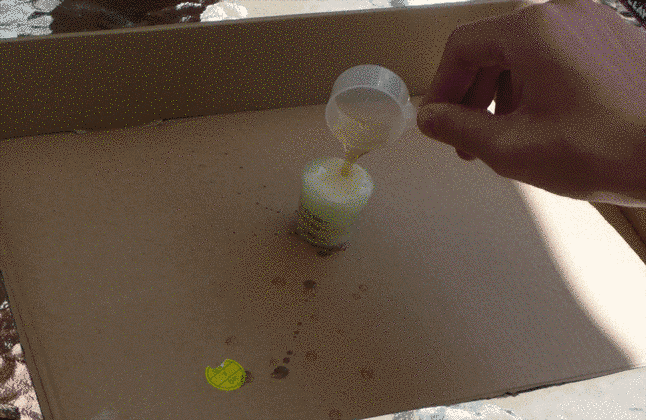
Place the cardboard on a table. You might want to put a layer of paper towels underneath the cardboard just to protect against drips. It might also be a good idea to put some aluminum foil on top of the cardboard to make future cutting easier. In one 15 mL shot glass, place about half a tablespoon of baking soda and add 10 mL or so water - stir the mixture a little to help dissolve some of the baking soda. Next, add a few drops of dishwashing detergent to this mixture. Place the shot glass or cup with the mixture in the center of your flat piece of cardboard. In another shot glass, pour a small amount of vinegar, somewhere between 5-10 mL depending on how much “flow” you want. Quickly pour the vinegar into the baking soda-water-detergent mixture, as shown in this animation:
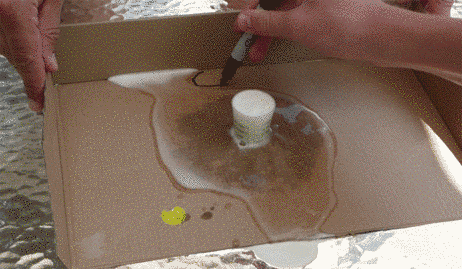
After the foaming settles down, mark the outer boundary of the foam on the cardboard with a marking pen. You may need to mark a few cm away from the boundary so that the liquid doesn’t gunk up the pen. Remove the shot glass mixture, and dab away any liquid with a bunch of paper towels. Take your first color of modeling clay, and spread it out to the boundary you just marked, making sure that you leave a hole for the shot glass. The clay layer doesn’t have to be very thick, just enough to cover up the cardboard. If there are a few lumps, that’s OK, it will make some interesting patterns for the next layer.
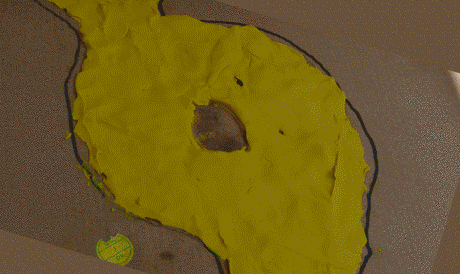
Recharge the shot glass with another baking soda–water–detergent mixture and place back in the center. Pour in another 5-10 mL of vinegar, and repeat the activity with a different color of modeling clay. Slowly you’ll build up layers of different colors of modeling clay (animated GIF in Figure 5.). Sometimes a new clay layer will completely cover up an older layer of clay, and sometimes the frothy flow will run down all the layers and ooze out onto the cardboard and make a new pool. These are similar to the behaviors of lava layers in a real life volcanic complex. The different flow layers of a volcano can have different properties depending on the chemistry and volume of the lava flow.
When you are finished, you’ll have a multi-colored pile of modeling clay that reflects the flow history of your volcanic construct model. To finish, you can stuff the last remaining color in the hole left by the shot glass to mimic a plug dome. Or you can leave it empty to simulate a central magma chamber collapse.

For even more fun, you can take core samples of your volcano to see if you can recreate the internal structure and history of the pile. This is even more challenging if you have two teams making volcano models, in which case you can swap models to try to guess the other team’s flow history. To make a core sample, use a clear plastic drinking straw and carefully push into the pile at a sample point. A clear plastic straw lets you see the layers without having to push them out. By carefully selecting core sample locations, you can get an idea of the hidden layer structure and the build history of the pile. Just like a real volcano, the lower layers are almost always older, while the upper layers are almost always younger.
Use your core samples to create a cross-section diagram of your model stratovolcano. To do this, take multiple core samples in a line across your model – we’ll call this your desired transect. Using a piece of paper, draw out the layer sequences as we did in the image below, making sure that you note any thin layers. Next, show the colors that are observed on the surface along your transect. Take more sample cores as needed. Line up the layer sequences and show where the layers might pinch out, or pinch in. This will give you a geological map of a cross-section of your stratovolcano. To check your map, use a sharp knife to cut across your transect line and reveal the internal structure of your stratovolcano. (Caution! Too dull a knife will blur the layers.) If you used aluminum foil in the first step, pulling the volcano apart should be easy.

Congratulations! You've just used surface expression, core sampling, and geologic mapping to derive the hidden history of your volcanic construct!
Protect Our Shared Future
You help us defend humanity and prevent asteroid impacts. Donate now to become a Planetary Defender!
Donate